A HI-FI VACUUM TUBE AMPLIFIER
by Fred Nachbaur, Dogstar Music ©1998, 2000

4: CONSTRUCTION HINTS


The prototype of the RA-100 was constructed on an aluminum chassis with bottom plate, and an aluminum front panel (both from Hammond). The chassis size is 17" x 10" x 2" (432mm x 254mm x 51mm) and features spot-welded corners for strength, and flanges on the underside for mounting a cover plate.

The front panel is designed to fit into a standard 19" rack, and measures 19" x 7" (483mm x 178mm). The mic/line trim pots and input jacks, Power, Standby and PA mode switches, and indicator lamps pass through both the front panel and the front edge of the chassis, securing the panel to the chassis. Strips of 1/16" steel bracing about 1«" wide and 12" long are used to provide additional structural support; without them the chassis is a bit too flimsy to support all that "iron" (transformers and filter choke).

All other controls and indicators are mounted on the upper portion of the front panel. The tone control pots are mounted to their own little PC boards, as are the LEDs for the power meters. The input and output jacks, speaker outputs, fuses and line cord are mounted on the rear apron of the chassis.

If you wish to duplicate the layout of the prototype, download the file artwork.zip, (be sure to read "artwork.txt" included in the zipfile) which includes blueprint templates for the chassis, front panel, and rear panel. Print them out and tape to the chassis (and front panel), then use a centre-punch to locate the required holes. The front panel and rear apron layouts can be photocopied onto self-stick mylar film, which can be stuck to the panel and apron before assembly to make workable text legend "silk screens".

It is highly recommended that the pre-amplifier modules, driver modules, tone-control cards and power meters be wired on PC boards, as per the artwork provided in the artwork.zip file. Optionally, you can wire the bulk of the power supply on PC boards also. For the prototype, I got as far as making boards for the main positive supply, but had enough of PCB etching and built the remaining sections either on perfboard (positive and negative regulators) or simply siliconed the capacitors to the chassis and hardwired the remaining components to the chassis (filament supplies).

Note that the preamplifier modules and driver modules are designed for double-sided boards. This can be tricky, and again is recommended only for experienced PC prototypers.

Note also: There is a polarized component shown on either side of the centre tube (12AT7) which is not used in normal applications; this was left as an option should someone wish to use the preamp in a "cathodyne" configuration. This, and its associated output connection pads are ignored in this design.

If you are interested in commercial production of this design, contact me for Gerber files of the PC boards which can be used for bulk PC board production.

Wiring tips
       Output Transformer Connections

       Connect the primary wires of the transformer as follows:

      Red: -------------Raw B+
Solid brown: ----- plate of V9 (V13) = pin 3
Brown w/ trace: -- screen of V9 (V13) = pin 4
Solid blue: ------- plate of V10 (V14) = pin 3
Blue w/ trace: ---- screen of V0 (V14) = pin 4


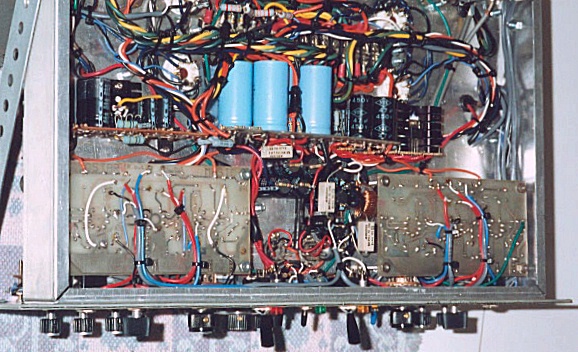
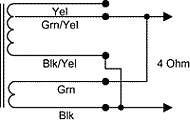
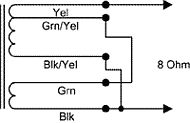
       Connect the secondary wires of the transformer as appropriate for your speaker impedance. Because of the voltage feedback method, this design does a bit better with higher impedances; for this reason the 8- or 16-ohm connections are recommended.
4 ohm 8 ohm 16 ohm
4 ohm 8 ohm 16 ohm
Change R517/617 to 820K Change R517/617 to 1.6M
Change C503/603 to 6.8 pF Change C503/603 to 3.3 pF


Other tips

Adjustment

Assuming that everything goes well, there is not much to adjust. Turn the unit on (in Standby mode) and let it warm up for at least a minute. Check the main supply voltages:


Measure the grid voltages of the 6L6GC's, one channel at a time. A convenient point to measure this is at the anodes of the protection diodes on the driver card, the end sitting right near the centre of the card. Adjust the BIAS and BALANCE controls to give -72 volts at each grid. The BALANCE control will be quite symmetrical, a fact that you can use to get the voltages to converge quite rapidly.

Only after you have gotten the grid bias "in the ballpark" should you even consider applying B+ to the 6L6GC's by flipping the Standby switch. Also, get into the habit of always having a load on the speaker outputs, even if you are not applying any signal. It just takes one bad transient to ruin your tubes or transformer (not to mention your day)

Cathode current vs. Grid voltage

If your tubes are reasonably well-matched, the cathode current on each tube of each push-pull pair should be within about 20%. If not, your tubes aren't very well matched. This is not necessarily fatal, you can trim the BIAS and BALANCE pots to get the cathode currents approximately equal (in the range of 40-50 milliamps) by measuring the voltage across the 10- ohm cathode resistors. (50 milliamps will give a reading of 0.500 volts).

In any case, only the most discerning ears will hear any difference in reproduction quality, especially at lower volumes, and especially in "clean" mode because of the self-correcting nature of negative feedback.

At the recommended setting (40-50 mA cathode current, or -72 volts grid bias), the amplifier will actually be operating in Class A mode (both tubes conducting at all times) at power outputs under a few watts. Beyond that it will go into Class AB1 mode, and the tubes take turns going into cut- off beyond a certain signal level. The grid bias essentially controls the point at which this "crossover" takes place. Decreasing the grid bias raises this point, resulting in less distortion. I don't recommend going any lower than -60 volts. At about -55 volts the plates of the tubes start to glow red. Not a good thing. Even at -60 volts, the power transformer will get too hot to touch after a couple hours.

At the other extreme, say around -85 volts, the tubes are sitting closer to cutoff and the amplifier gets a lot more efficient (less heat) but crossover distortion becomes quite noticable, even on a scope.

Considerable experimentation has shown the recommended -72V grid bias to be the best compromise between the efficiency and distortion factors. Still, there is some leeway here. If you want absolutely the best sound quality you can get, and don't run the amp for more than an hour or two at a time, set bias for about -60 volts. On the other hand, if you want to run the amplifier continuously, a bias of -80 is recommended.

A Word About Fuses

I'm sure you know what's coming here, but I just have to say it. Don't replace the fuses with ones of larger ratings, unless you absolutely positively know what you're doing. The main AC fuse should be no larger than 4 ampere, slow blow (MDL). In fact, 3 ampere fuses are recommended. Go to 4 amperes only if you're using a lower grid bias and find that 3 ampere fuses are regularly blowing. Even then, don't be upset with me if you ruin your power transformer. If 3 amp fuses blow at the recommended grid bias, even at extended high volume settings, something is wrong and you should see that it gets corrected instead of just putting a "crowbar" into the fuse-holder. Fuses are designed to protect your equipment, and you.

The "raw B+" fuse should under no circumstance be rated for greater than 0.6 ampere (600 ma.), fast blow (AGC). Be sure you use a fuse holder that is capable of withstanding the over 600 volt potential to chassis ground. (It should also be noted that the AGC series is not UL or CSA approved for use over 240 volts AC. The rationale is that at higher voltages, arcing could possibly occur across the burned ends of the fuse wire. However, my thought on this is that any protection is better than no protection at all.)

If you need to replace the B+ fuse, turn the amplifier off first.


Underside of RA-100 Prototype

Back Home Next
BACK INDEX NEXT